
IN THIS ARTICLE: I'm going to show you the four main methods of connecting a subwoofer to an amplifier or active speakers...
… I'll include pictures and let you know which cables you need.
Are you ready to take your audio setup to the next level?
Whether you're a music lover, a movie buff, or a gaming enthusiast, adding a subwoofer to your amplifier & speakers can dramatically enhance your listening experience.
The deep, rich bass that a subwoofer provides brings depth and dimension to your music, making every beat, explosion, and rumble more impactful.
But how do you connect a subwoofer to your speakers?
While it might seem daunting at first, the process is actually quite straightforward and in most cases it’s simply using a subwoofer cable to connect the two devices together.
In this comprehensive guide, we'll walk you through the steps to seamlessly integrate a subwoofer into your home audio system.
We'll cover everything from understanding the components you need, choosing the right connection method, and fine-tuning your setup for optimal performance.
For the purpose of this guide we'll refer mostly to active bookshelf speakers and most of the pictures will be of active speakers, but the connections are exactly the same for an AV receiver for home cinema or a stereo amplifier.
So, let's dive in and unlock the full potential of your audio system by connecting your subwoofer to your speakers.
Understanding Your Equipment
Before diving into the connection process, it's essential to understand the components involved as there are a couple of ways you can make the connection.
As a minimum you’ll need the following items:
-
Amplifier or Active Speakers: You’ll need an amplifier, AV receiver or active bookshelf speakers (speakers with a built-in amplifier). Ideally you’ll want speakers or an amplifier with a dedicated subwoofer output. If your existing kit doesn’t have a sub output then there is an alternative method which we’ll cover later in this blog.
-
Subwoofer: This speaker is designed to reproduce low-frequency sounds (bass). Subwoofers can be active (with a built-in amplifier) or passive (requiring an external amplifier). For this guide, we'll focus on active subwoofers as these are the most common setups for home audio.
- Subwoofer Connection Cable: Depending on your equipment, you'll need the appropriate cables, either an RCA audio cable or a subwoofer cable.
The best, and easiest way to connect is when your speakers or amplifier has a dedicated subwoofer output.
How To Connect A Subwoofer
There are four main methods of connecting a subwoofer to your speakers.
I’ve listed them in a best to least order and have included pictures of the connectors and the type of cable you’ll need.
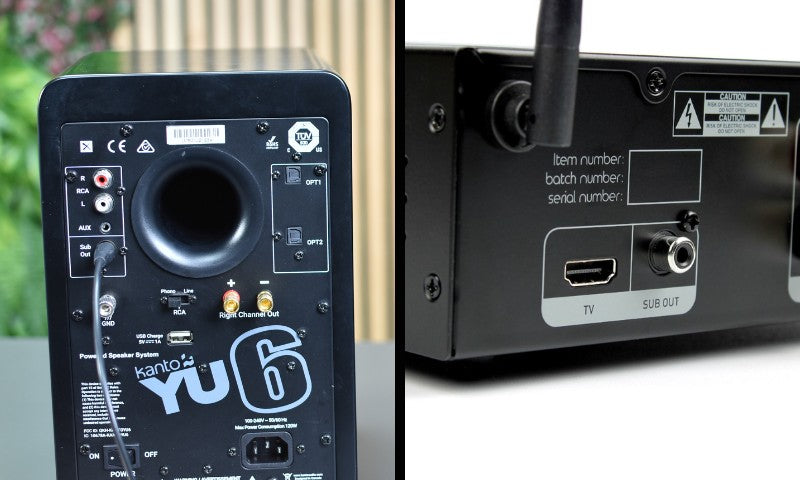
Method 1 - Via Dedicated Subwoofer Output
This is a single cable connection between the SUB OUT and the input of your active subwoofer.
Your active speakers or amplifier will need a dedicated output, it’ll be a single RCA output labelled “SUB OUT” or similar and you’ll need to use a dedicated subwoofer cable to make the connection.
You'll probably notice that your subwoofer has two inputs, red and white, but your speakers or amplifier only has a single RCA output. Plug the single cable into the white port only. It might be marked "LFE" on your subwoofer.

Cable Type: Single RCA Subwoofer Cable
How To Make The Connection:
- Connect one end of the subwoofer cable to the SUB OUT port on your speakers / amplifier.
- Connect the other end of the subwoofer cable to the LFE input on your subwoofer. If there are no ports marked LFE then use the white port of the RCA input.
It should look like this:

Method 2 - Via Stereo Audio Output
This is a RCA or 3.5mm output between your speakers / amplifier and your subwoofer.
Your active speakers or amplifier will need to have an output labelled “LINE OUT” or in some cases it may still be marked as “SUB OUT”.
This is a stereo output so can feed a subwoofer using a stereo audio cable, note that as this is a stereo line output your subwoofer will need to have a built-in crossover; but don’t worry, most do!

Cable Type: RCA to RCA (Stereo Red & White) or 3.5mm to RCA Cable
How To Make The Connection:
- Connect one end of the RCA or 3.5mm cable to the line output (may be marked sub out) on your active speakers or amplifier.
- Connect the other end of the RCA cable to the RCA input on your subwoofer.
It should look like this:

Method 3 - Via RCA Pass Through
If you’re using active speakers that do not have a subwoofer output then there is a method that can give you some extra bass with one minor drawback.
There are certain subwoofers such as the Edifier T5 that have an audio pass through allowing you to connect the subwoofer to the RCA line input of your speakers, you then connect your audio source such as a WiFi music streamer to the subwoofer itself rather than your speakers.
This is not a common subwoofer feature though so if you’re going for this option make sure you choose a subwoofer that can connect in this way.
The WiFi music streamer will play through your speakers, via the subwoofer, so all music played from that source will benefit from the subwoofer.
Wondering what the drawback that I mentioned is? Well the subwoofer will only play via the connected audio source and the connected source must be able to adjust the volume.
So if you have active speakers with Bluetooth built-in then the subwoofer will not work when streaming via Bluetooth. Likewise for any other audio inputs connected to the speakers.
To clarify, you can use this method with any audio source with it's own volume control, but only one source.
This setup works best with a WiFi streamer such as the WiiM Pro - you can then connect further audio equipment to the WiiM Pro itself and switch between sources in the app.
Cable Type: RCA to RCA Audio Cable
How To Make The Connection:
- Connect one end of the RCA cable to the line input of your active speakers or amplifier.
- Connect the other end of the RCA cable to the “signal out” input of your subwoofer.
- Connect your audio source (record player, WiFi streamer) to the “signal input” of the subwoofer.
It should look like this:

Method 4 - Via Speaker Level Input
This is much less common but if your amplifier does not have a subwoofer output you can use a speaker level subwoofer instead.
This type of subwoofer is less common, but in theory can connect to any amplifier.
The subwoofer itself will have speaker inputs, usually the red and black spring terminals. Note that this method does not work with active speakers.
If you want to go down this route then take a look at the AV Link M8S.
Cable Type: Speaker Cable
How To Make The Connection:
- Connect your amplifier's speakers output terminals to the left / right hi level speaker input terminals of the subwoofer.
- Connect your speakers to the left / right speaker terminals on the subwoofer.
How To Setup A Subwoofer
Now that you’ve made the connection, it’s time to adjust the subwoofers settings and optimise it to suit your bass tastes.
Active subwoofers are actually pretty easy to setup in just a few steps.
Step 1: Set The Crossover Frequency
Most subwoofers have a crossover frequency control, which determines the highest frequency the subwoofer will handle.
Set the crossover frequency to match or slightly overlap the lower end of your active speakers' frequency range.

Typically, a good starting point is around 80 Hz so we’d suggest setting the LPF knob to around this point.
Step 2: Adjust The Subwoofer Volume
Start with the subwoofer volume set to a low level, I’d suggest around the 30% mark for initial setup. We’ll fine tune it in step 4.

Once everything is connected and powered on, you can gradually increase the volume to achieve the desired balance with your active speakers.
Step 3: Power On & Test
Plug in and power on your active speakers and subwoofer.
Play a piece of audio content with a wide range of frequencies to test the setup.
I’d recommend that you play music you actually listen to regularly, just because you’re adding a subwoofer doesn’t mean you have to test it out with some dubstep!
Step 4: Fine-Tuning
Fine-tuning the subwoofer placement and settings can significantly impact sound quality.
The best position for your subwoofer is adjacent to one of your speakers but you can experiment with different locations in your room to find the best spot for your subwoofer.
Now that we have some music playing you can adjust the subwoofer volume and crossover settings as needed to achieve a balanced sound.
This part is relatively simple and self-explanatory, whilst listening to music adjust the crossover (LPF) gradually to a level where you are happy with when the bass is kicking in, If the music’s thumping along but the subwoofer isn’t then adjust the LPF up, likewise if it’s too thumpy then adjust the LPF down.
Finally we can adjust the volume using the same technique as above, simply listen to some music and adjust the subwoofer volume to a point that sounds best to you.
Ideally you want to balance the subwoofer and speakers, you don’t want the bass overpowering the mid and high frequencies, the goal is to add depth and feeling to your music, not give you a headache.
That’s it, you should now be set up, fine tuned and enjoying your music even more than before.
Subwoofer FAQ’S
When looking for a subwoofer, or when setting up your subwoofer, there are a few terms that you’ll see and hear in product specs and on the subwoofer itself.
In this section we’ll cover the most common things you’ll need to know about your subwoofer.
What is LFE?
LFE stands for "Low-Frequency Effects." It's a specific channel used in surround sound audio systems to carry deep, low-frequency sounds.
These are typically the booming, rumbling sounds like explosions, thunder, and other impactful audio effects in movies. The LFE channel is designed to handle frequencies ranging from 3 Hz to 120 Hz, which are often too low for standard speakers to reproduce effectively.
What is a Crossover?
A crossover is an electronic filter used in audio systems to direct specific frequency ranges to the appropriate speakers.
On a subwoofer, the crossover determines the frequency at which audio signals are divided between the subwoofer and the main speakers.
Essentially, it ensures that the subwoofer handles only the low-frequency (bass) sounds while the main speakers manage the mid and high frequencies.
For the majority of active subwoofers found on our website they’re going to have a built in crossover, you’ll see some knobs on the back for controlling the frequency in which the subwoofer kicks in at. This may be marked as “L.P.F (Low Pass Filter)”.
The LPF ensures that only the low-frequency sounds (bass) are sent to the subwoofer, while higher frequencies are filtered out.
If you set the LPF to a higher frequency then the subwoofer is going to be thumping along with higher frequencies of your music, whereas if you set it to a lower frequency it’ll work in the lower frequencies.
It’s important to balance this out nicely, you don’t want the subwoofer thumping along with vocals all the time, you want it to kick in when the bass drops (literally!).
What is a Phase Switch?
A phase switch on a subwoofer allows you to adjust the phase relationship between the subwoofer and the main speakers.
Phase refers to the timing alignment of sound waves produced by different speakers.
When sound waves from the subwoofer and main speakers are out of phase, they can cancel each other out, resulting in weaker bass response and a less cohesive sound.
The phase switch typically has two settings: 0° and 180°.
How Does a Phase Switch Work?
The phase switch inverts the polarity of the subwoofer’s output signal.
Here's what happens at each setting:
- 0° Position: The subwoofer outputs sound waves in sync with the input signal, maintaining the original polarity.
- 180° Position: The subwoofer outputs sound waves with inverted polarity, meaning the peaks of the sound waves become troughs and vice versa.
For most cases you’ll leave it set to the 0° position but if you’re placing your subwoofer on the opposite side of the room facing the speakers then you may want to adjust to 180° and see (hear!) if it sounds better.
What is the Auto On Switch?
The Auto On switch on a subwoofer is a feature that allows the subwoofer to automatically power on when it detects an audio signal and power off when no signal is detected for a specified period.
This feature is designed to make the subwoofer more convenient to use and to save energy by turning off the subwoofer when it’s not needed.
The switch usually works like so:
- ON: The subwoofer will be turned on and will stay on all the time even when no music is playing.
- AUTO ON: The subwoofer will automatically turn on when music starts playing, and after a set time of no music it’ll turn off automatically to save energy.
Some higher end subwoofers may also feature trigger inputs or RS232 ports for connecting to higher end systems, it’s not something you’ll find on the majority of home audio subwoofers though so beyond the remit of this blog.
Final Thoughts
Connecting a subwoofer to your active speakers can significantly improve your audio experience by adding depth and richness to your sound system.
By following this step-by-step guide, you can ensure a seamless and effective connection, allowing you to enjoy enhanced bass and overall audio quality.
Whether you're a music enthusiast, movie buff, or gamer, the right setup can make all the difference in your listening experience. Happy listening!


